Ursula de Strattone
  • Home
  • Links
  • About Ursula
    • Honors Received
    • Service and Offices
  • Contact Me
  • Project and Event Blog

Artemisian Coronation, Barony of Arn Hold, plus a new Skjoldehamn Hood

3/30/2019

0 Comments

 
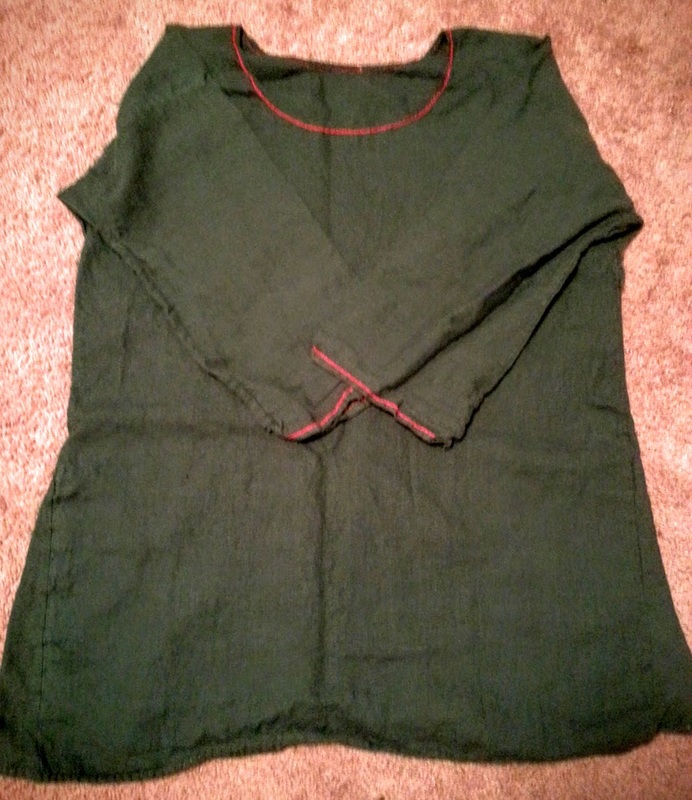
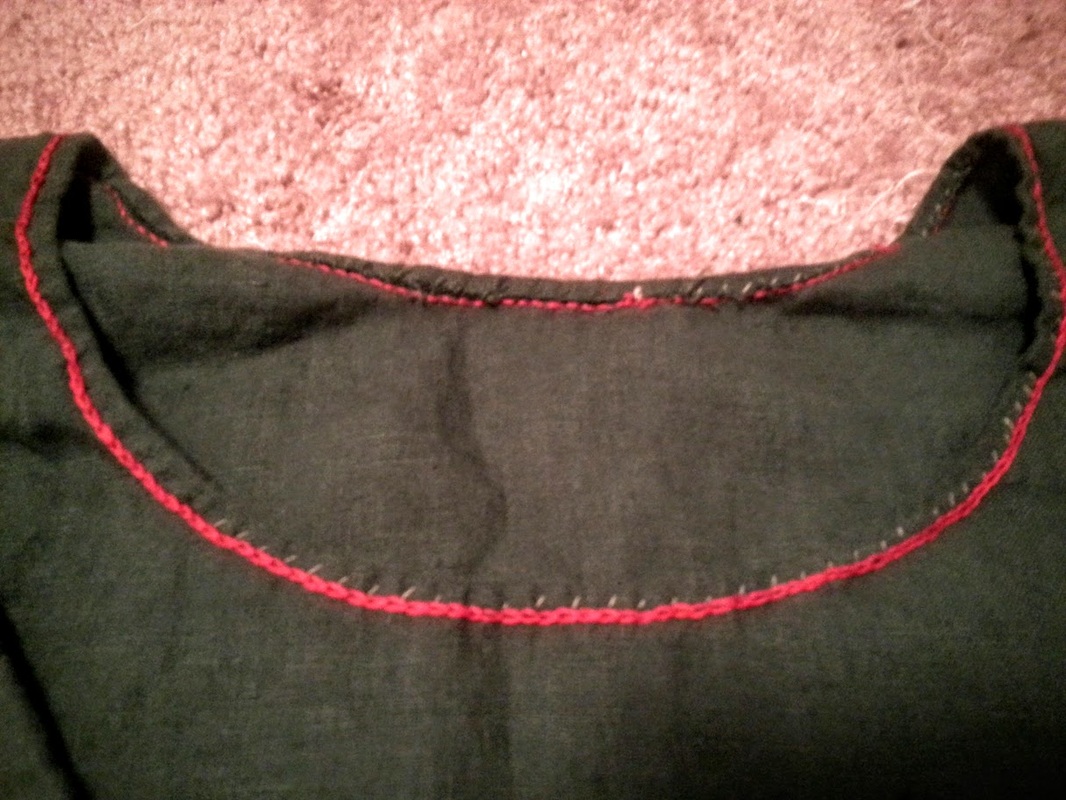
In March, our Barony hosted the coronation of Their Majesties Floki and Gwenevere and the stepping down of Their Excellencies Yuri and Sumayya.  Gwen and Floki have Norse personas and have a strong dedication to research and accuracy, so I wore some of my Norse garb, including a newly made Skjoldehamn Hood.  The hood is a lightweight gray wool tabby (the original is in a 2/2 twill with slightly different color warp and weft) with a green linen lining (the original was unlined, but I wanted a bit of extra warmth and something to help it lie more smoothly), and the edges are finished with blanket stitch in a gold silk thread.  The original hood had whip-stitched edging around the face, but I like the look of the blanket stitch more, and since it's also a period stitch I subbed it in.  I found the medieval-baltic article about the hood especially useful, and used the dimensions of the original listed on that page for my hood.  If it was any smaller, I wouldn't be able to get it on over my (rather large) head and thick hair, but it does work and the hood is roomy enough to stay on and keep me cozy.  This has become one of my favorite bits of garb, to be honest.  In the future I'd love to try to make one more "from scratch," as I've always been fascinated with the fact that the cloth was woven from a double-coated sheep, with the stronger coarser guard hairs (tog in Icelandic sheep) used as warp thread and the softer finer under-coat (thel in Icelandic sheep) used as weft, which makes perfect sense.  I've been working through an Icelandic fleece that I think would be a great candidate for this.

In any case, the event was a lot of fun, though we mostly spent our time chasing the toddler, who had fun for a while but eventually melted down due to overstimulation and no nap.  

The coronation itself was truly wonderful.  With King Yuri expiring on the throne and queen Sumayya stating (rightly) that as a Mongol queen she had a right to continue to rule, but she chose to pass the crown on to her heir, queen Gwen.  Gwen also stated that she could choose to rule alone, but she opted to call her deceased husband back from Hel with the help of a truly impressive cadre of otherworldly-looking shieldmaidens.  Floki obligingly returned, stating when the harvest came, he would be forced to return to Hel.  I'm getting goose bumps just thinking about it.

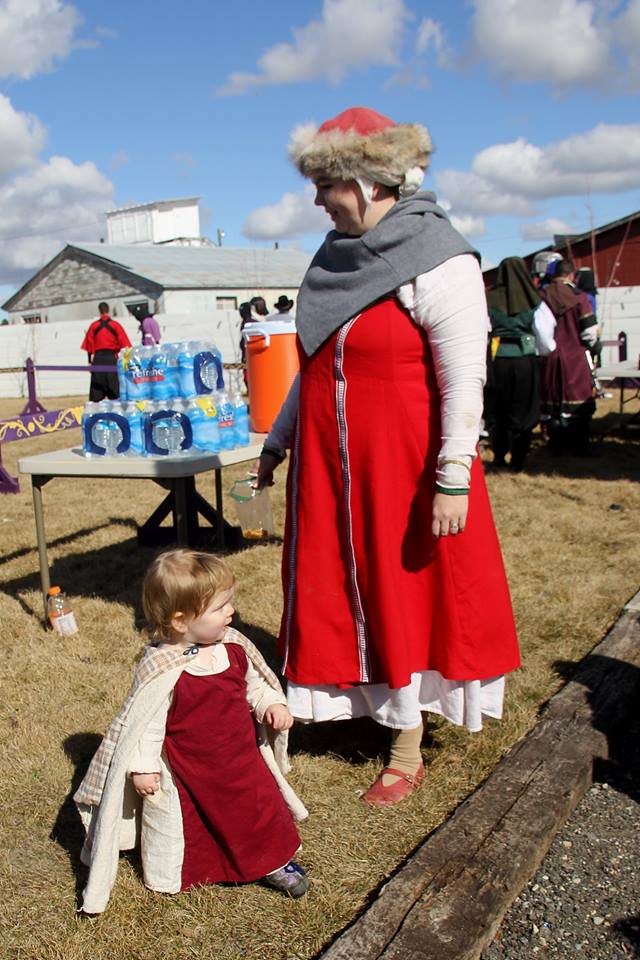
The location, the Gem County Fairgrounds in Emmett, ID, worked really well for our group.  I'd love to see them used again.  For now, here's a quick pic, courtesy of my husband HL Aonghus, of our daughter and I in our red dresses enjoying the spring sun.  You can see my hood a bit here, but I'll come back later and add some more pictures.
Picture
0 Comments

Crown Tournament Oct 2018

10/31/2018

0 Comments

 
I was honored to be asked by my dear friend Baroness Merin du Bourbon to be her consort for fall crown this year.  I enjoyed making her a favor to wear a year ago when she fought for me, though I never did get a picture since I wasn't able to attend at that time (being days away from having my daughter).  I made her a pair of knitted striped garters in green and white with tassels at the ends.  They look very fetching under her armor.

For this event I wanted a new dress, and I had about 2.5 yards of a lovely lightweight red wool with a subtle check, which I received from my mom who had kept it in her stash since she made a dress for me with it when I was a toddler (photo pending).  I used it to make a new hangerok for myself with overlapping fronts so I could wear it as breastfeeding garb.  I also had some white, black, and red trim in my stash made by Sir Brynjolfr years ago in a swap for some trousers I made him.

My pattern for the hangerok was very simple.  I used the basic concept of the 4 gore apron dress (four straight rectangular body pieces with triangular gores between them to form the skirt and modified it.  I had four straight panels, but each were 1/3 of my bust measurement (with a bit extra for seam allowance).  The front had two of the panels together, with the tops sewn together but the rest of the panels not connected.  The two side/back panels met at the middle of the back, with a gore inserted from hip to hem along that seam, and gores inserted where the side panels met the front panels.  I added trim around the top and along the seams where the front panel met the sides.  I used scrap fabric for the straps, which connect near the back seam and at the seams where the side panels connect to the front panels.  I made a rudimentary schematic of the pieces, and if anyone would like a more detailed tutorial, please let me know!
Picture
The event was lovely and Merin truly honored me with her skill and chivalry.  My husband also competed for his inspiration, our friend Law.  Here is the only photo of me I could find from the event, which gives you some idea of the dress.  Merin, my daughter, and Merin's hubby Caspar are also featured.  Photo by Nicole Scofield.
Picture
I have a few other photos of this dress from other events, so stay tuned for more!
0 Comments

Naughty Ursula

6/24/2016

0 Comments

 
Almost a whole month without an update!  I'm terrible.  I have been slacking off even though I have another finished object from May to share, and plenty to talk about as I learn more about 16th century men's garb and work on my friend Don Gomez's outfit for his Pelican elevation.

I haven't had a lot of energy lately, and I kept forgetting to take pictures, which is what really held me up.  

Anyway, here's my other finished project for May, a t-tunic to go with the brown linen trousers I made.  These make pretty serviceable SCA pajamas for cold evenings or morning lounging with a pair of boots, my furry hat, and a belt around the waist.  I've worn the trousers under my dresses for warmth a few times too.

The tunic is very standard, rectangular construction, underarm gussets, small gores at the sides that extend from waist to the bottom hem, which covers my hips for warmth.  I used leftover green linen from Brynjolfr's trousers, hand-hemmed the neckline, sleeves with linen thread, and then did a simple chain stitch embroidery in red cotton (hey, it's what I had, and these are pajamas!) around the sleeves and neckline.  

For sleeping in, I just wore this over a long-sleeved teeshirt.  Obviously, an under-tunic might be better, and I will have leftover linen from my vigil shirt project that might work for that.  I will also probably make a wool over-tunic for more warmth, since I'm always cold at night, no matter what precautions I take.  The hot water bottle I brought to celtic revolt to put in bed with me at night was a stroke of genius though.

If I were to make another of these, and I probably will, I'd taper the sleeves so the openings are smaller and fit closer on the wrist.  I will probably go back and change that at some point, but I haven't bothered yet.

Here are a couple photos with not great lighting.  First is a view of the tunic overall, second is a neckline detail image.
Picture
Picture
0 Comments

A FO for March and a new project!

3/28/2016

1 Comment

 
Well, I can proudly say that Sir Brynjolfr's trousers are finished well before the Memorial Day deadline we agreed on.  I am probably going to see him at Honor War in a few weeks, so I can bring them for him to try on in case of any modifications.  For now, though, here's the finished trousers.  I used my serger on these since hand-sewing wouldn't even be visible, and I wanted them to be machine-washable and sturdy.
Picture
They are based on the style known in the SCA as Rus trousers, which actually seems to have been pretty common throughout the Viking world.  There are lots of images of men wearing full trousers that appear creased or pleated, which come in below the knee for a tight fit.  

I have to say a huge thank you to my husband, Lord Aonghus, who helped me struggle through these.  He gave me all the source info I could possibly ask for, and helped keep me on track (check out his references on his Norse Garb pinterest board).  It was at his suggestion that I make the lower leg portion full-length instead of just a shorter strap/cuff below the knee.  He said these pants were sometimes worn without leg-wraps, and that they are more comfortable and stable with leg wraps if the trousers go all the way down.

The waist band is made of a double-folded strip of linen, eight inches wide.  Aonghus says he makes his trousers so that each leg is twice as wide ashis thigh measurement.  I went with the full width of the linen, since I had enough, it was close to that measurement,  and it was easy to measure/cut.  The thigh pieces are attached by a crotch gusset that runs from the front waistband to the back, and is a couple inches longer than the client's rise.  The bottom leg sections are about two inches larger than his calf, and should reach to the ankle.

Below is a photo of the full width of the trousers.  It kind of makes me think of those before/after weight loss photos with someone holding their giant old pants.
Picture
The waist band was made about two inches longer than Sir Brynjolfr's waist.  I then pleated the pants into the waistband by marking halves, quarters, etc. until I had about one inch pleats.  I did the same thing with the trouser legs where the lower leg connects.  A lot of the construction of these pants was based on conjecture, since actual period examples are really scarce.  Many reenactors have made similar pants without adding a waist band by simply folding over the top of the pants and adding a drawstring.  My experience of wearing garments like that is that they're uncomfortable.  The gathered material shifts around, feels baggy, makes clothes look rumpled on top, and can be kind of a pain to get in and out of.  I made a waist band for comfort and ease of wearing, but I think it's a plausible addition to a pair of pants, and likely will never be seen by anyone except Sir Brynjolfr anyway.

I didn't get a decent photo yet, but I made fingerloop braided ties at the waist band, and can add additional sets if he wants the pants more snug.  Overall, I'm proud of how they came out.  This was a fun easy project, and I'm looking forward to seeing the finished object on the recipient!  

Another plus, is that even for the rather tall Sir Brynjolfr, this project only took two yards of 60 inch wide linen, making it an economical garment too!
Picture
I wanted to share my project notebook here, because it shows the very simple pieces that make up the Rus pants (lefthand page).  A couple of rectangles and squares, and that's it.

The other reason I wanted to show it is that it shows the struggles I went through with cutting out my new project, a 14th century kirtle (aka cotte).  I had exactly four yards of 60 inch wide wool, and if you haven't learned from reading my blog yet, I love trying out new styles.  I had gotten help from a friend with draping a pattern, but when I read the info presented on the Medieval Tailor website I started getting really interested in the look and construction of these ubiquitous garments.  You can obviously read a lot more about this on the site itself, but I really liked the author's insights about the fact that kirtles were sort of the transitional item between rectangular construction (think t-tunics, bliauts, etc.) and tailored/draped construction (think tudor/renaissance).  

The author bases her pattern on a lot of images, her own experience, and the construction of the Herjolfsnes finds from Greenland, specifically H38, H39, and H41, all of which feature side gores that reach from under the armscye to the hem.  The front and back panels resemble the four-panel kirtle we are all used to seeing, but the fitting in the waist takes place along the side gores as well as the front and back seams.  This has a couple of benefits in my opinion: 1) No pre-draped pattern required, because who would really have the extra fabric for that in period? 2) Takes advantage of narrow fabric width on period looms.  My widest pieces as cut out were 30 inches wide, far closer to period fabric width. 3) Almost no waste.  The pieces I had left from cutting out are large enough to be used for something, and the pieces that will be trimmed away in fitting will be negligibly small.

There are only a couple of challenges here.  You may be able to see from my first cutting diagram, that I mistakenly only accounted for two side gores (enough for one side), then had to panic and re-configure to get what I needed out out of the fabric I had.  I had to plan for slightly narrower front and back gores, but I made it work.  The second challenge is that I've never done a sleeve like this before.  I eyeballed my sleeve pattern based on the instructions from the site, and I'm sure I'll need to fiddle with it to get it to fit, but I really just want a sleeve that is relatively fitted but in which I can still use my arms.

After much scribbling and swearing, I got the pattern cut out, with about a quarter yard left over.  This is really a fabric-conservative pattern!  The pile on the left is my dress, the one on the right is the scrap fabric, which could become anything at this point... extra sleeve gussets, maybe garters or a pouch, material for future applique projects...  You may see a stain on the top left piece of fabric.  I have no idea where that came from, as I washed the fabric when I got it, but I'll try washing the dress once more when it's finished.  If it just won't go away, I'll dye the whole thing.  It's wool, so that should be easy.
Picture
I think I'm going to go ahead and hand-sew this dress.  I know it's a bit crazy, but I really enjoy hand sewing, and it'll be a fun way to get better at my stitches, and to get comfortable with the narrow seam allowances you get in extant finds and can get away with when using wool.  I have silk thread to use for the construction, and then maybe this will be an A&S project entry someday.  I only set the front gores in wrong twice last night when I got started sewing, even with my trusty assistant Betsy to oversee my work.  
Picture
1 Comment

    Ursula

    I like to: play with fleece, spin, knit, weave, sew, garden, cook, eat, bake bread, dance, read, sing, and learn new things.

    Above image is from the Beinecke Ms. 229 Arthurian Romances c. 1275-1300 France.

    All photos by me unless otherwise credited.

    Like what you see?  Buy me a coffee on ko-fi!

    Archives

    May 2019
    March 2019
    February 2019
    January 2019
    November 2018
    October 2018
    July 2018
    June 2018
    May 2018
    April 2018
    March 2018
    December 2017
    July 2017
    June 2017
    May 2017
    April 2017
    March 2017
    February 2017
    January 2017
    December 2016
    November 2016
    September 2016
    August 2016
    July 2016
    June 2016
    May 2016
    April 2016
    March 2016
    February 2016
    January 2016
    November 2015
    October 2015
    August 2015
    July 2015
    June 2015
    April 2015
    March 2015
    February 2015
    January 2015
    December 2014
    November 2014
    October 2014
    September 2014
    August 2014
    July 2014
    June 2014
    May 2014
    March 2014
    February 2014
    October 2013
    July 2013
    June 2013

    Categories

    All
    16th Century
    Archery
    Avacal
    Awards
    Baby
    Beads
    Bears
    Bliaut
    Breastfeeding
    Brewing
    Calligraphy
    Classes Taught
    Dancing
    Darning
    Device
    Dogs
    Download
    Embroidery
    Events
    Food
    Garb
    Gardening
    Garlic
    Hair
    Handouts
    Handsewing
    Heraldry
    Hometown Pride
    Italian
    Kirtle
    Knitting
    Mending
    Needle Lace
    Norse
    Photos
    Planning
    Rapier
    Retinue
    Roman
    Scrolls
    Slug
    Spinning
    Sword And Horse
    Thrown Weapons
    Weaving

    RSS Feed

Powered by Create your own unique website with customizable templates.